mercoledì 14 dicembre 2022

D365FFO – Send email and attachment by code

Following these steps it possible to create an Excel file from code, and send it by email as an attachment without  saving it in a physically folder.

From Cloud and OnPrem environment.

Example x++ code:

 using OfficeOpenXml.Style;   
 using OfficeOpenXml.Table;   
 using System.Net;    
 using Microsoft.Dynamics.ApplicationPlatform.Services.Instrumentation;   
 using Microsoft.DynamicsOnline.Infrastructure.Components.SharedServiceUnitStorage;    
 using Microsoft.Dynamics.ApplicationPlatform.Environment;    
 using Microsoft.Dynamics.AX.Framework.FileManagement;   
    
 public void createExcelandSendByEmail()   
 {   
      #Properties   
      #AOT   
      #File   
   
      str emailSenderName;   
      str emailSenderAddr;   
      str emailSubject;   
      str emailBody;   
   
      emailSubject      = "to set";   
      emailBody           = "to set";   
      emailSenderAddr = "to set";   
      emailSenderName = "to set";    
      System.IO.Stream workbookStream = new System.IO.MemoryStream();   
      System.IO.MemoryStream memoryStream = new System.IO.MemoryStream();    
   
      using(var package = new OfficeOpenXml.ExcelPackage(memoryStream))   
      {    
           var worksheets = package.get_Workbook().get_Worksheets();   
           var worksheet = worksheets.Add("Sheet1");   
           var cells  = worksheet.get_Cells();       
           var currentRow = 1;    
   
           /*-------HEADER PART -START- -------*/    
   
           var cell = cells.get_Item(currentRow,1);    
           cell.set_Value("First Value");    
           cell=null;   
   
           cell = cells.get_Item(currentRow,2);   
           cell.set_Value("Second Value");    
           cell=null;   
   
           /*-------HEADER PART -END- -------*/    
   
           /*-------RECORD -START- -------*/    
   
           currentRow++; //    
   
           cell = null;  
   
           cell= cells.get_Item(currentRow, 1);   
           cell.set_Value("Value");   
   
           cell= null;   
   
           cell= cells.get_Item(currentRow, 2);   
           cell.set_Value("Value");   
   
           /*-------RECORD -END- -------*/   
   
           package.Save();   
   
           var messageBuilder = new SysMailerMessageBuilder();   
             
           messageBuilder.addTo(listRecipient);   
           messageBuilder.setSubject(emailSubject);   
           messageBuilder.setBody(emailBody);   
           messageBuilder.Setpriority("add your value");   
             
           messageBuilder.addAttachment(memoryStream, "Excel_File_Name.xlsx"); // Attach the Excel file    
           SysMailerFactory::sendNonInteractive(messageBuilder.getMessage()); // Send email available in batch    
      }     
 }
Parameters:

smtp.office365.com
587
SSL/TLS required a YES


Set the Outlook address in the execution user setup ( the user who will perform the process).
SMTP provider Id.


enjoy

giovedì 3 novembre 2022

D365FFO - Salvare SSRS report come file PDF e caricarlo su una Azure Storage

In questo post vediamo come generare il file PDF di un report (Fattura a testo libero in questo caso) e fare l'upload su di una Azure storage.

Ho preso spunto da questo post:

https://meritsolutions.com/render-report-memory-stream-d365-aka-ax7/

ed ho aggiunto la parte per l'upload su Azure:

 using Microsoft.Azure;  
 using Microsoft.WindowsAzure.Storage;  
 using Microsoft.WindowsAzure.Storage.Blob;  
 using Microsoft.WindowsAzure.Storage.File;  
   
 class LILTestClassPDFUpload  
 {  
   public static void main(Args _args)  
   {  
     Args args;  
     CustInvoiceJour CustInvoiceJour;  
   
     select firstonly    CustInvoiceJour  
       where CustInvoiceJour.InvoiceId == "000051"  
                && CustInvoiceJour.SalesId == "";  
   
     Filename fileName = strFmt("%1_%2%3",curExt(),CustInvoiceJour.InvoiceId,".pdf");  
     FreeTextInvoiceController controller = new FreeTextInvoiceController();  
     FreeTextInvoiceContract contract = new FreeTextInvoiceContract();  
     SRSPrintDestinationSettings settings;  
     Array arrayFiles;  
     System.Byte[] reportBytes = new System.Byte[0]();  
     SRSProxy srsProxy;  
     SRSReportRunService srsReportRunService = new SrsReportRunService();  
     Microsoft.Dynamics.AX.Framework.Reporting.Shared.ReportingService.ParameterValue[] parameterValueArray;  
     Map reportParametersMap;  
     SRSReportExecutionInfo executionInfo = new SRSReportExecutionInfo();  
             
           //esempio:  
           //mystorageAccountName.file.core.windows.net\myRootFolder\mySubFolder  
     str           accountName   = "mystorageAccountName";   
     str           key       = "Er0kY1KUDX9/D3tunAD6twYaBT6ux3nJp...etc..";  
     str           rootFolder   = "myRootFolder";  
     str           custLinkFolder = "mySubFolder";  
     ;  
   
     args = new Args();  
     args.record(CustInvoiceJour);  
     contract.parmCustInvoiceJourRecId(CustInvoiceJour.RecId);  
   
     // Provide details to controller and add contract  
     controller.parmArgs(args);  
     controller.parmReportName(ssrsReportStr(TTL_FreeTextInvoice, Report));  
     controller.parmShowDialog(false);  
     controller.parmLoadFromSysLastValue(false);  
     controller.parmReportContract().parmRdpContract(contract);  
     // Provide printer settings  
     settings = controller.parmReportContract().parmPrintSettings();  
     settings.printMediumType(SRSPrintMediumType::File);  
     settings.fileName(fileName);  
     settings.fileFormat(SRSReportFileFormat::PDF);  
   
     // Below is a part of code responsible for rendering the report  
     controller.parmReportContract().parmReportServerConfig(SRSConfiguration::getDefaultServerConfiguration());  
     controller.parmReportContract().parmReportExecutionInfo(executionInfo);  
   
     srsReportRunService.getReportDataContract(controller.parmreportcontract().parmReportName());  
     srsReportRunService.preRunReport(controller.parmreportcontract());  
     reportParametersMap = srsReportRunService.createParamMapFromContract(controller.parmReportContract());  
     parameterValueArray = SrsReportRunUtil::getParameterValueArray(reportParametersMap);  
   
     srsProxy = SRSProxy::constructWithConfiguration(controller.parmReportContract().parmReportServerConfig());  
     // Actual rendering to byte array  
     reportBytes = srsproxy.renderReportToByteArray(controller.parmreportcontract().parmreportpath(),  
       parameterValueArray,  
       settings.fileFormat(),  
       settings.deviceinfo());  
   
           //upload file...  
     if (reportBytes)  
     {  
       System.IO.MemoryStream stream = new System.IO.MemoryStream(reportBytes);  
   
       str filetemppath = File::SendFileToTempStore(stream,fileName);  
       System.IO.Stream fileStream = File::UseFileFromURL(filetemppath);  
   
       var storageCredentials = new Microsoft.WindowsAzure.Storage.Auth.StorageCredentials(accountName, key);  
       CloudStorageAccount storageAccount = new Microsoft.WindowsAzure.Storage.CloudStorageAccount(storageCredentials, true);  
       CloudFileClient fileClient = storageAccount.CreateCloudFileClient();  
       CloudFileShare share = fileClient.GetShareReference(rootFolder);  
                  
       if (share.Exists(null, null))  
       {  
         CloudFileDirectory rootDir = share.GetRootDirectoryReference();  
         CloudFileDirectory fileDir = rootDir.GetDirectoryReference(custLinkFolder);  
                       
         if (fileDir.Exists(null, null))  
         {  
           CloudFile cfile = fileDir.GetFileReference(fileName);  
           
           if (cfile.Exists(null, null))  
           {  
             throw error("@SYS95668");  
           }  
           else  
           {  
             str a = File::SendFileToTempStore(stream,fileName);  
             try  
             {  
               cfile.UploadFromStream(fileStream,null,null,null);  
             }  
             catch(Exception::Error)  
             {  
               throw error("Error during file upload");  
             }  
           }  
         }  
       }  
     }  
   }  
 }  

mercoledì 28 settembre 2022

AX 2012 - QR code su SSRS

In questo post vediamo come aggiungere un QR ad un report SSRS. Per fare ciò AX mette a disposizione un componente esterno.

Per prima cosa occorre creare nella tabella temporanea del report un campo di tipo Bitmap che chiameremo QRCode (possiamo per esempio copiare il campo CompanyLogo presente nella tabella del report della fattura).

Con questo metodo inserito nella nostra DP possiamo generare il BitMap da associare al nostro campo QRCode:

protected Bitmap getQRCode()
{
    Bindata                 bindata = new Bindata();
    System.Drawing.Bitmap   obj;
    Filepath                filepath,
                        filePathName;                
    container               con;
    Microsoft.Dynamics.QRCode.Encoder   encoder;
    FileIoPermission  filepermission; 

    filepath = @'\\MyServer\Temp\';
        
    filePathName = System.IO.Path::Combine(filepath
                                            ,strFmt("%1.bmp","img"));
        
    filepermission = new FileIoPermission(filePathName, 'rw');
    filepermission.assert();
        
    encoder   = new Microsoft.Dynamics.QRCode.Encoder();
    obj = new System.Drawing.Bitmap(encoder.Encode("StringToEncode"));
    obj.Save(filePathName,System.Drawing.Imaging.ImageFormat::get_Bmp());
    bindata.loadFile(filePathName);
    con = bindata.getData();
        
    CodeAccessPermission::revertAssert();
   
    return con;
} 

Sul Design del report dobbiamo poi definire un controllo di tipo image, possiamo copiare dai report standard che visualizzano i loghi (Conferma ordine, Fattura etc...). Ecco il risultato:


giovedì 25 agosto 2022

AX 2012 - Excel in batch

Come sappiamo, le classi STD  per importare/esportare excel che AX mette a disposizione, (SysExcelApplication,SysExcelApplication_XP,SysExcelApplication_2007.. etc) non sono in grado di girare in batch perchè marcate come "client":


Per poter importare/esportare file in excel in batch occorre usare un componente esterno: ClosedXML:

https://www.nuget.org/packages/ClosedXML/

Una volta scaricata la DLL

https://drive.google.com/file/d/1AraBmgypormDRpLNfh_9WnDR6M77iJmz/view?usp=sharing

 ed importata come reference in ax possiamo utilizzarla per esempio così:

   ClosedXML.Excel.XLWorkbook   workbook;  
   ClosedXML.Excel.IXLWorksheet  worksheet;  
   ClosedXML.Excel.IXLCell     cell;  
     
   CustTable            custTable;  
     
   int               row,  
                   col;  
   
   try  
   {  
     workbook = new ClosedXML.Excel.XLWorkbook();  
       
     worksheet = workbook.AddWorksheet("Customers");  
       
     row = 1;  
       
     while select firstOnly10 CustTable  
     {  
       col = 1;  
         
       cell = worksheet.Cell(row,col);  
       cell.set_Value(CustTable.AccountNum);  
       col++;  
               
       cell = worksheet.Cell(row,col);  
       cell.set_Value(CustTable.name());  
       col++;  
         
       row++;  
     }  
       
     workbook.SaveAs(@'\\MyServer\Temp\lil01.xlsx');  
   }  
   catch(Exception::CLRError)  
   {  
     throw error (AifUtil::getClrErrorMessage());  
   }  
     
   info("Terminato!");  

mercoledì 3 agosto 2022

D365FFO - Creare un wizard

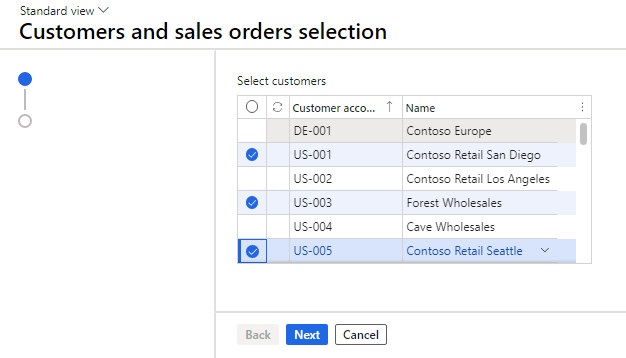
In questo post vediamo come creare un "wizard". Il nostro wizard avrà due step. Il primo dove selezioniamo da 1 a n Clienti e il secondo dove selezioniamo da 1 a n SalesOrder. Il tasto "finish" andrà semplicemente a stampare i valori selezionati.

Per prima cosa creiamo una form usando il pattern "Wizard" che chiameremo "LILTestWizard".la nostra form avrà due datasource (CustTable e SalesTable) e sarà fatta così:


la form dovrà contenere i seguenti metodi:

 public class LILTestWizardForm extends FormRun  
 {  
   LILTestWizardClassForm sysWizard;  
   void init()  
   {  
     super();  
   
     if (element.args().caller())  
     {  
       sysWizard = element.args().caller();  
     }  
   }  
   
   void run()  
   {  
     super();  
   }  
   
   SysWizard wizard()  
   {  
     return sysWizard;  
   }  
 }  
Dobbiamo poi definire una classe che chiameremo "LILTestWizardClassForm" fatta così:
 class LILTestWizardClassForm extends SysWizard  
 {  
   FormDataSource     CustTableDS;  
   FormDataSource     SalesTableDS;  
     
   CustTable        custTable;  
   SalesTable       salesTable;  
   
   MultiSelectionHelper  selectionHelperCustTable,  
               selectionHelperSalesTable;  
   
   FormName formname()  
   {  
     return formstr(LILTestWizardForm);  
   }  
   
   public void setupNavigation()  
   {  
   }  
   
   public boolean validate()  
   {  
     return true;  
   }  
   
   public static str description()  
   {  
     return "Customers and sales orders selection";  
   }  
   
   public static void main(Args args)  
   {  
     LILTestWizardClassForm wizard = new LILTestWizardClassForm();  
   
     if (wizard.prompt())  
     {  
       wizard.run();  
     }  
   }  
   
   public void finish()  
   {  
     selectionHelperCustTable  = MultiSelectionHelper::createFromCaller(this.formRun());  
     selectionHelperSalesTable  = MultiSelectionHelper::createFromCaller(this.formRun());  
   
     CustTableDS       = this.formRun().dataSource(tableStr(CustTable));  
     SalesTableDS      = this.formRun().dataSource(tableStr(SalesTable));  
   
     selectionHelperCustTable.parmDatasource(CustTableDS);  
     selectionHelperSalesTable.parmDatasource(SalesTableDS);  
   
     custTable  = selectionHelperCustTable.getFirst();  
     salesTable = selectionHelperSalesTable.getFirst();  
   
     while(custTable)  
     {  
       info(custTable.AccountNum);  
   
       custTable = selectionHelperCustTable.getNext();  
     }  
   
     while(salesTable)  
     {  
       info(salesTable.SalesId);  
   
       salesTable = selectionHelperSalesTable.getNext();  
     }  
   
     super();  
   }  
   
 }  
A questo punto dobbiamo creare un menù item di tipo action che punta a LILTestWizardClassForm e metterlo a menù.

Ecco il risultato:


martedì 2 agosto 2022

D365FO - Process an event based KanBan

 According to the rules defined in the kanban rule form for the item and "event" replenishment strategy, the system will generate for each rule a new kanban.


So in relation to the case shown above we will have 2 kanbans generated.

The first kanban is generated automatically at the sales order line generation for the specific item (as defined in the parameters), the minimum quantity for generating it is 16 pcs, to a maximum of 48 pcs (as defined in the parameters).


The second kanban is generated automatically in relation to the first one, as reported below.


Basically the rules are related to a production flow expressed below in the following diagram.


Each operation is even related to a workcell using the production flow.

So once a sales order line is created for the specified item we get the following kanbans generated in the system.


Before processing the kanban we have to schedule it using the form KanBan schedule board.


In order to advance a kanban of type "process" into the system we have to access the form Kanban board for process job.


In order to complete this kanban we have to start and then complete it using the buttons underlined above. 

In order to use the next kanban related to the one already completed we need to schedule it (on the correct workcell) using the function shown below.


Then we access the function Kanban board for process job.

In order to advance the KanBan we need to start and complete it. Once completed the entire flow is finished and we can ship the items to the final customer.


giovedì 7 luglio 2022

AX 2012 - D365FFO - Calcolare il numero giorni lavorativi in base al calendario

 Per calcolare il numero di giorni lavorativi in base al calendario in un intervallo di date possiamo usare questo Job:

 static void LILCalcWorkingDays(Args _args)  
 {  
   WorkCalendarSched workCalendarSched;  
   FromDate      fromDate;  
   ToDate       toDate;  
   counter       workDays,  
             totaldays;  
   CalendarId     calendarId = "BaseCal";  
   ;  
   
   toDate = mkDate(7,7,2022);  
     
   workCalendarSched = new workCalendarSched();  
     
   //giorni lavorativi dal 7/6/2022 al 7/7/2022  
   for(fromDate = toDate - 30; fromDate < toDate; fromDate++)  
   {  
     if(workCalendarSched.isdateopen(calendarId,fromDate))  
     {  
       workDays++;  
     }  
       
     totaldays++;  
   }  
   
   info(strfmt("Total days: %1 - Total working days: %2",totaldays,workDays));  
 }  

venerdì 15 aprile 2022

D365FFO - Gestione traduzioni

Gestire le traduzione di un testo in AX è un'operazione molto comune. Abbiamo a disposizione due framework. Il primo è quello che si appoggia sulla tabella LanguageTxt, già presente fin dalle primissime versioni; il secondo è quello che è stato introdotto sulla 2012 e si basa sulla classe SysTranslationHelper. In questo post vediamo come utilizzarli entrambe.

Allo scopo definiamo una tabella  codice,descrizione che chiameremo "LILtestTable" con la relativa form omonima.

1)LanguageTxt framework

Per prima cosa dobbiamo creare l'estensione della tabella LanguageTxt ed aggiungere la relation con la nostra tabella (possiamo copiare tutte le proprietà dalle relation già esistenti, si veda l'estensione  standard LanguageTxt.Extension) così:


A questo punto nella nostra form basta trascinare nel design il menù item display "LanguageTxt" ed impostare "LILTestTable"  nella proprietà "datasource".


Con questo metodo possiamo recuperare la traduzione:

 public static FreeTxt txt(  
     Voucher  _code,  
     LanguageId _languageId = CompanyInfo::languageId())  
 {  
      LILTestTable testTable = LILTestTable::find(_code);  
   
      LanguageTxt languageTxt = LanguageTxt::find(  
           testTable.TableId,  
           testTable.RecId,  
           _languageId);  
   
      return languageTxt.Txt ? languageTxt.Txt : testTable.Description;  
 }  

2)SysTranslationHelper framework

Dobbiamo creare una nuova tabella che chiameremo LILTestTableTranslation fatta così:


Questa nuova tabella và aggiunta come datasource alla form e messa in join deleayed con il datasource principale LILtestTable. Dobbiamo poi scrivere una classe fatta così:

 class LILTestTableTranslationHelper extends LedgerDimensionTranslationHelper  
 {  
   protected TableId getBackingEntityTranslationTableId()  
   {  
     return tableNum(LILTestTableTranslation);  
   }  
   
   protected Array getGetBackingEntityTranslatedFieldIds()  
   {  
     Array backingEntityTranslatedFieldIds;  
   
     backingEntityTranslatedFieldIds = new Array(Types::Integer);  
     backingEntityTranslatedFieldIds.value(1, fieldNum(LILTestTable, Description));  
   
     return backingEntityTranslatedFieldIds;  
   }  
   
   public static client void main(Args _args)  
   {  
     LILTestTableTranslationHelper TranslationHelper;  
   
     TranslationHelper = LILTestTableTranslationHelper::newFromArgs(_args);  
   
     TranslationHelper.launchTranslationDetailForm();  
   }  
   
   public static client LILTestTableTranslationHelper newFromArgs(Args _args)  
   {  
     LILTestTableTranslationHelper       TranslationHelper;  
     LILTestTable               LILTestTable;  
   
     if ( !(_args && _args.record() is LILTestTable))  
     {  
       throw error(strFmt("@SYS134996", tableStr(LILTestTable)));  
     }  
   
     LILTestTable = _args.record() as LILTestTable;  
   
     TranslationHelper = new LILTestTableTranslationHelper();  
     TranslationHelper.parmBackingEntity(LILTestTable);  
   
     return TranslationHelper;  
   }  
   
 }  

Ho preso la classe STD LedgerDimensionTranslationHelper perchè è una buona base generica che si presta molto all'estensione

Dobbiamo poi creare un menù item action che punta a questa classe ed inserirlo nel design della form:


Con questo metodo possiamo recuperare la traduzione:
 public Description localizedDescription(LanguageId _languageId = new xInfo().language())  
 {  
      Description       description;  
      LILTestTableTranslation translation;  
   
      if(this.RecId)  
      {  
           select firstonly translation  
           where translation.LILTestTable == this.RecId  
                && translation.Language == _languageId;  
             
           description = translation.Description;  
      }  
   
      if(!description)  
      {  
           description = this.Description;  
      }  
   
      return description;  
 }  

Conlusioni:
Come abbiamo visto il primo framework è molto più semplice del primo e di fatto non richiede codice.Lo svantaggio è che richiede di aggiungere ogni volta una nuova relation alla tabella languageTxt. 

Un vantaggio che ho riscontrato utilizzando il secondo framework (oltre ad essere più "user friendly")è che avendo una tabella dedicata risulta più semplice creare la relativa entity delle traduzioni

martedì 29 marzo 2022

AX 2012 - D365FFO - Refresh caller datasource (retain position)

Refreshare il DS chiamante è un'operazione  comune in AX. La versione 2012 ha introdotto il parametro "retain position" nel metodo research. A volte però neanche questo è sufficiente. Questo interessante post fà un pò di chiarezza sull'argomento:

http://devexpp.blogspot.com/2012/02/refresh-datasource-and-retain-position.html

giovedì 17 marzo 2022

D365FFO -- RSAT for WHS terminal

In order to implement RSAT using the WHS terminal, we have first of all to check if the following parameter is set (Enable RSAT support) at the following path Warehouse management > Setup >  Warehouse management parameters.


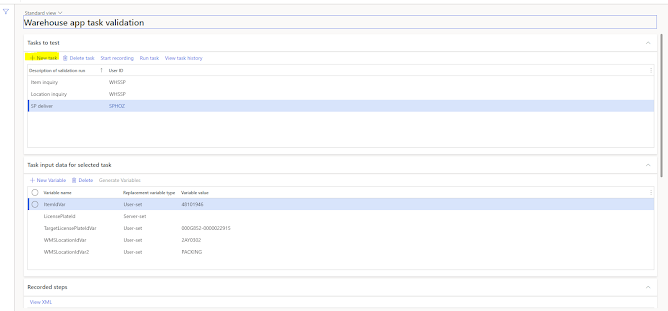
Once set the previous parameter, we should access the following path Warehouse management > Periodic task >  Warehouse app task validation.


In order to create a new test case we should click on the button new as reported above. Then once we have set the fields userid and description of the task we can start the recording of the tasks with warehouse app clincking on Start recording.


Once we started the registration we can do the activities to be recorded in the warehouse app.


Once we have done this procedure we must load the parameters from the recording clicking on the button Generate variables.


The system automatically fills the variables defined in the registration. In case we want to run the script we must access the same form and clicking Run task, as reported below.


martedì 8 marzo 2022

D365FFO - Check the number of rows in a table / add a total in a table / Group by a specific value

 In D365FO some new functions have been added in order to speed up the check of the number of lines / totals in the form.

For example accessing a specific form (purchase invoice form), we can add a footer in the form clicking with the left button of the mouse and selecting the function "Show footer".


The system will add in the bottom part of the form the total number of rows selected.

In case we want to group by a specific value of the form we can do it right clicking on the column and selecting "Group by this column" as reported below.


The system will show all the records grouped by the values shown in that field as reported below.


In case we want to calculate the total of a numerical field we can right click on that field and select the function Total this column.


The result will be the following one.