mercoledì 27 settembre 2023

D365FFO - Messaggio di errore: "Stopped (error): X++ Exception: The text associated with this work item cannot be found in the assignee’s language"


Eseguire i seguenti passaggi:

  1. Richiamare il Workflow;
  2. Andare alla versione attiva del flusso e controllare che la configurazione del flusso di lavoro disponga delle traduzioni nelle lingue utilizzate dagli utenti come lingue predefinite;
  3. Controllare che la lingua predefinita degli utenti del flusso sia la stessa in uso dal workflow.


D365FFO - Financial Tag


La feature Financial Tag, attivabile dalla Gestione funzionalità dà la possibilità di definire fino a 20 tag definiti dall’utente, da utilizzare nei giornali (Giornale generale e Giornale generale globale).

Caratteristiche ed utilizzo dei Finacial Tag:

  • I tag non fanno parte della struttura dei conti;
  • I valori dei tag non vengono convalidati durante l’immissione o la registrazione;
  • I valori dei tag predefiniti non vengono immessi dai dati anagrafici;
  • I valori dei tag non sono inclusi nei set di dimensioni, in D365 non è possibile generare un bilancio di verifica per visualizzare i saldi per i valori dei tag. I valori dei tag sono visualizzati come dettaglio delle transazioni;
  • I tag dovrebbero essere utilizzati per tenere traccia di valori non riutilizzabili (numeri di documi o numeri di riferimento);
  • Possono essere attivi o disattivati in qualsiasi momento;
  • Non possono essere eliminati;
  • I valori dei tag vengono utilizzati solo per l’analisi e l’elaborazione interna;
  • I tag vengono impostati a livello di persona giuridica, possono essere condivisi utilizzando la funzione Dati condivisi.

1 Set up


1.1 Impostazione delimitatore dei Financial Tag


In Contabilità generale à Impostazione contabilità generale à Parametri di contabilità generale, selezionare il Tab Tag finanziari e definire il Delimitatore segmento di tag finanziari. Il delimitore non deve essere utilizzato in nessun valore di tag immesso nelle transazioni e non può essere modificato dopo essere stato definito.


       1.2 Creazione Financial Tag

In Contabilità generale à Piano dei conti à Tag finanziari à Tag finanziari, selezionare Nuovo e creare un Tag finanziario.

  •          Inserire l’etichetta (non sono ammessi gli spazi ed i caratteri speciali);
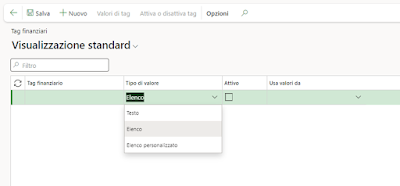
  •         Nel campo Tipo valore selezionare Testo, Elenco o Elenco personalizzato;
  •         Se si è selezionato Elenco nel campo Tipo valore, selezionare l’origine valore nel campo           Utilizza valori da. Il campo contiene un elenco di entità da cui è possibile seleziona i valori       dei tag durante l’immissione della transazione.


Selezionare il Tab Attiva o disattiva tag per attivare il tag finanziario creato e poi selezionare OK.


       2 Inserimento Financial Tag nelle transazioni


Quando si immettono le registrazioni, è possibile definire i valori dei Tag nell’intestazione delle registrazioni. Tali valori verranno utilizza come valori predefiniti per le righe del giornale. Come per gli altri valori predefiniti nel giornale, verranno automaticamente inseriti nelle nuove righe aggiunte al giornale.


È possibile immettere il Tag finanziario direttamente sulla singola riga del giornale.


       2.1 Esempi di utilizzo

  • Stock: tenere traccia di tutte le transazioni per un’unità specifica tutta la vita di un bene;
  • Ratei fornitore: tenere traccia delle spese maturate per fornitore nella contabilità generare (inserendo l’ID fornitore per le spese provenienti dalle voci di competenza);
  • Lotto: tracciamento delle spese per lotti specifici, valore aggiunto, ecc. passando attraverso la contabilità generale;
  • Campagne di marketing: tenere traccia delle spese in base alla campagna di marketing.

martedì 26 settembre 2023

D365FFO - Creare campi calcolati su una vista

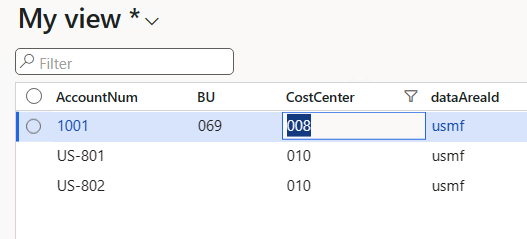
In questo post vediamo come creare campi calcolati su una vista.Come esempio creiamo una vista basata su VendTable che mostra come colonne l'account num e le dimensioni finzanziarie di default "Cost center" e "Business unit". Questa possibilità è stata introdotta con AX 2012 e potenziata con la 365. In Ax 2009 invece non è possibile aggiungere metodi alle viste.

1) Creare una nuova view che chiameremo LILVendTableDefaultDimension

2) Aggiungere come datasource VendTable

3) Aggiungere AccounNum come field

4) Aggiungere due nuovi campi di tipo string così:


        che chiameremo CostCenter e BU

5) Aggiungere due nuovi metodi alla vista, che chiameremo  getCostCenterDisplayValue e getBUDisplayValue,per recuperare il display value della dimensione CostCenter e Business unit

 public static str getCostCenterDisplayValue()  
   {  
     str VendTableDefaultDimension = SysComputedColumn::returnField(tableStr(LILVendTableDefaultDimension)  
                                     ,dataEntityDataSourceStr(LILVendTableDefaultDimension,VendTable)  
                                     ,fieldStr(VendTable, DefaultDimension));  
   
     str backingEntityType = int2Str(tableNum(DimAttributeOMCostCenter));  
   
   
     return strFmt(@"select  
                 top 1 DimensionAttributeValueSetItemView.DISPLAYVALUE  
             from  
                 DimensionAttributeValueSetItemView  
             join  
                 DIMENSIONATTRIBUTEVALUE  
             on  
                 DIMENSIONATTRIBUTEVALUE.RECID = DimensionAttributeValueSetItemView.DIMENSIONATTRIBUTEVALUE  
             join  
                 DIMENSIONATTRIBUTE  
             on  
                 DIMENSIONATTRIBUTE.RECID = DimensionAttributeValueSetItemView.DIMENSIONATTRIBUTE  
             where  
                 DIMENSIONATTRIBUTEVALUESET = %1  
             and   BACKINGENTITYTYPE     = %2",VendTableDefaultDimension  
                                 ,backingEntityType);  
   }  
 public static str getBUDisplayValue()  
   {  
     str VendTableDefaultDimension = SysComputedColumn::returnField(tableStr(LILVendTableDefaultDimension)  
                                     ,dataEntityDataSourceStr(LILVendTableDefaultDimension,VendTable)  
                                     ,fieldStr(VendTable, DefaultDimension));  
   
     str dimensionName = 'BusinessUnit';  
   
   
     return strFmt(@"select  
                 top 1 DimensionAttributeValueSetItemView.DISPLAYVALUE  
             from  
                 DimensionAttributeValueSetItemView  
             join  
                 DIMENSIONATTRIBUTEVALUE  
             on  
                 DIMENSIONATTRIBUTEVALUE.RECID = DimensionAttributeValueSetItemView.DIMENSIONATTRIBUTEVALUE  
             join  
                 DIMENSIONATTRIBUTE  
             on  
                 DIMENSIONATTRIBUTE.RECID = DimensionAttributeValueSetItemView.DIMENSIONATTRIBUTE  
             where  
                 DIMENSIONATTRIBUTEVALUESET = %1  
             and   DIMENSIONATTRIBUTE.NAME  = '%2'",VendTableDefaultDimension  
                                  ,dimensionName);  
   }  
N.B: se si usano le stringhe nei parametri della where ( per esempio dimensionattribute.name =...) vanno messi tra doppi apici ''

6) Compilare le proprietà ViewMethod dei due campi coi nomi dei metodi appena creati

7) Buildare e sincronizzare


In AX 2012 la firma del metodo deve contenere la parola "server":

 public static server str getBUDisplayValue()  
Inoltre la funzione 

dataEntityDataSourceStr

Non è disponibile è và sostituita con la stringa del nome del datasource nella view

giovedì 10 agosto 2023

How to extend the Dialog class in D365 FFO

How to extend the standard class DIALOG in order to use in different points the custom methods(like lookup, validation etc).
It can be useful to use methods and standardize the code.

class MyCustomDialog extends Dialog

  public void my_lookupCustom(FormControl _callingControl )
  {
  // some code
  }
  boolean my_validateCustom(FormControl _callingControl)
  {
    // some code
  }
  boolean my_CustomGenericMethod(FormControl _callingControl)
  {
     // some code
  }
}

How to use the custom methods:

MyCustomDialog dialog; // use my custom class

dialog = new MyCustomDialog("TEXT");
dialog.addText("Some text");
dialog.my_CustomGenericMethod(....) ; 

Another way to use the custom methods:

// other example
 fieldSite.registerOverrideMethod(methodStr(FormStringControl, validate),
                                  methodStr(MyCustomDialog , my_validateCustom), dialog); 

Below how appear:


We can create different methods to meet our needs.

enjoy

sabato 24 giugno 2023

D365FO - KIT management

 In D365Fo there is a standard embedded kit management. It is reachable at the following menu Retail and Commerce.


Three functions are available in that place:

-    Product kits

-    Released product kits

   Kit orders


The first function allows the generation of a product having the flag kit activated as reported below.


Clicking on the button Configure in the button group Product kit, it's possible to define all the components the kit is made of.


Once the kit is approved, it will automatically generate a new variant related to the product master, usable everywhere in the system (it is then visible in the menu Released product kits).

For producing instead a Kit it is required to access the Kit order menu previously mentioned.


Once the warehouse is defined and the quantities to be produced, clicking on the button Post the system will consume the components and produce the kitted product (this function will use a BOMJournal to perform this activity).


venerdì 16 giugno 2023

How to find all D365 Security ROLES inheritance relations?


Is just a starting point

How can we catch all security relations OnPrem/Cloud environment? (also considering changes made by Security Configuration in Security Module)

It can be useful to know all the objects that have a relationship to the security role.

  • First a quicky recap:

The security AX2012/D365 consists of in three main elements:

The security inheritance – relations is like belog

The common security role tree is like below

A common issue or request is to find all relations about objects, to better understand how role work

-         which are the related duties?

-         which are the related privileges?

-        I need to know all security role dependency

....and others...

By SQL script we can find all security object references.

Table SECURITYOBJECTCHILDREREFERENCES can help us.

The main tables:

SECURITYPRIVILEGE

SECURITYDUTY

SECURITYROLES

SECURITYOBJECTCHILDREREFERENCES

Also the table SECURITYOBJECTCHILDREREFERENCES can be used for others query/relations

Run SQL scripts:

 -- All Privileges

select * from SECURITYPRIVILEGE

-- All Duty

select * from SECURITYDUTY

-- All Roles

select * from SECURITYROLES


HOW TO GET ALL SECURITY REFERENCES

  1. Get the list of all security roles with its duties

SELECT T2.Name as SecurityRole, T3.NAME as Duty
FROM SECURITYOBJECTCHILDREREFERENCES T1
JOIN SECURITYROLE T2 ON T1.IDENTIFIER = T2.AOTNAME
JOIN SECURITYDUTY T3 ON T1.CHILDIDENTIFIER = T3.IDENTIFIER
WHERE T1.OBJECTTYPE = 0 AND T1.CHILDOBJECTTYPE = 1

2. Get the list of all security roles with its privileges

SELECT T2.Name as SecurityRole, T3.NAME as Privilege
FROM SECURITYOBJECTCHILDREREFERENCES T1
JOIN SECURITYROLE T2 ON T1.IDENTIFIER = T2.AOTNAME
JOIN SECURITYPRIVILEGE T3 ON T1.CHILDIDENTIFIER = T3.IDENTIFIER
HERE T1.OBJECTTYPE = 0 AND T1.CHILDOBJECTTYPE = 2 

3. Get the list of all role-duty combination with privilege 

SELECT T2.Name as SecurityRole, T2.AOTNAME as RoleSystemName,  T3.NAME AS Duty, T3.IDENTIFIER as DutySystemName, T5.NAME as Privilege, T5.IDENTIFIER as PrivilegeSystemNam
FROM SECURITYOBJECTCHILDREREFERENCES T1
JOIN SECURITYROLE T2 ON T1.IDENTIFIER = T2.AOTNAME
JOIN SECURITYDUTY T3 ON T1.CHILDIDENTIFIER = T3.IDENTIFIER
JOIN SECURITYOBJECTCHILDREREFERENCES T4 on T4.IDENTIFIER = T3.IDENTIFIER
JOIN SECURITYPRIVILEGE T5 on T4.CHILDIDENTIFIER = T5.IDENTIFIER
WHERE T1.OBJECTTYPE = 0 AND T1.CHILDOBJECTTYPE = 1
AND T4.OBJECTTYPE = 1 AND T4.CHILDOBJECTTYPE = 2

Examples:

Duties related to role "SystemUser"

Privileges related to role "SystemUser" (by direct relation)

Privileges related to Role through Duties

enjoy

domenica 14 maggio 2023

D365FO - Cluster management in mobile warehouse product receipt process

 There is the option in D365FO to manage clusters while receiving goods, in order to define a path for performing the put away procedures or to just collect more put away together (just applicable in case we are managing receipt and put away in two different steps).

In order to manage it, we have to switch on in the receipt function the flag assign putaway cluster.


Then it is required to define a cluster profile as follows, defining when and how a cluster will be generated and the lines ordered in it, and to which work template it will be related.


The following menu item will be defined in the mobile app in order to manage the closure of the cluster.


In the putaway menuitem we must define that we want to proceed scanning the cluster id each time (defined in the field Directed by), as follows.


Perform the receipt on the mobile app.


At the closure of the receipt of each line we can define a new cluster id (as reported below).


Access the form for closing the clusterid, after scanning it click on the button close cluster as reported below.


Access the putaway function on mobile app as follows.


Scan the cluster and move the items to the final location.