giovedì 25 agosto 2022

AX 2012 - Excel in batch

Come sappiamo, le classi STD  per importare/esportare excel che AX mette a disposizione, (SysExcelApplication,SysExcelApplication_XP,SysExcelApplication_2007.. etc) non sono in grado di girare in batch perchè marcate come "client":


Per poter importare/esportare file in excel in batch occorre usare un componente esterno: ClosedXML:

https://www.nuget.org/packages/ClosedXML/

Una volta scaricata la DLL

https://drive.google.com/file/d/1AraBmgypormDRpLNfh_9WnDR6M77iJmz/view?usp=sharing

 ed importata come reference in ax possiamo utilizzarla per esempio così:

   ClosedXML.Excel.XLWorkbook   workbook;  
   ClosedXML.Excel.IXLWorksheet  worksheet;  
   ClosedXML.Excel.IXLCell     cell;  
     
   CustTable            custTable;  
     
   int               row,  
                   col;  
   
   try  
   {  
     workbook = new ClosedXML.Excel.XLWorkbook();  
       
     worksheet = workbook.AddWorksheet("Customers");  
       
     row = 1;  
       
     while select firstOnly10 CustTable  
     {  
       col = 1;  
         
       cell = worksheet.Cell(row,col);  
       cell.set_Value(CustTable.AccountNum);  
       col++;  
               
       cell = worksheet.Cell(row,col);  
       cell.set_Value(CustTable.name());  
       col++;  
         
       row++;  
     }  
       
     workbook.SaveAs(@'\\MyServer\Temp\lil01.xlsx');  
   }  
   catch(Exception::CLRError)  
   {  
     throw error (AifUtil::getClrErrorMessage());  
   }  
     
   info("Terminato!");  

mercoledì 3 agosto 2022

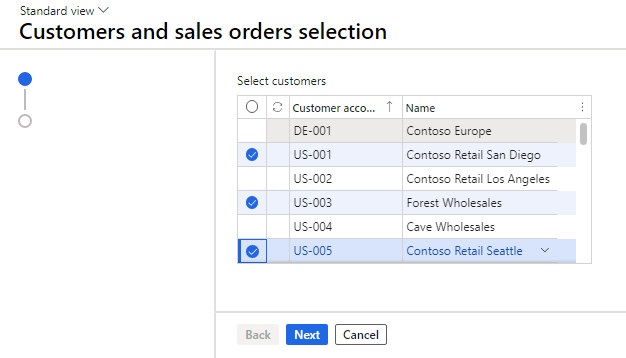
D365FFO - Creare un wizard

In questo post vediamo come creare un "wizard". Il nostro wizard avrà due step. Il primo dove selezioniamo da 1 a n Clienti e il secondo dove selezioniamo da 1 a n SalesOrder. Il tasto "finish" andrà semplicemente a stampare i valori selezionati.

Per prima cosa creiamo una form usando il pattern "Wizard" che chiameremo "LILTestWizard".la nostra form avrà due datasource (CustTable e SalesTable) e sarà fatta così:


la form dovrà contenere i seguenti metodi:

 public class LILTestWizardForm extends FormRun  
 {  
   LILTestWizardClassForm sysWizard;  
   void init()  
   {  
     super();  
   
     if (element.args().caller())  
     {  
       sysWizard = element.args().caller();  
     }  
   }  
   
   void run()  
   {  
     super();  
   }  
   
   SysWizard wizard()  
   {  
     return sysWizard;  
   }  
 }  
Dobbiamo poi definire una classe che chiameremo "LILTestWizardClassForm" fatta così:
 class LILTestWizardClassForm extends SysWizard  
 {  
   FormDataSource     CustTableDS;  
   FormDataSource     SalesTableDS;  
     
   CustTable        custTable;  
   SalesTable       salesTable;  
   
   MultiSelectionHelper  selectionHelperCustTable,  
               selectionHelperSalesTable;  
   
   FormName formname()  
   {  
     return formstr(LILTestWizardForm);  
   }  
   
   public void setupNavigation()  
   {  
   }  
   
   public boolean validate()  
   {  
     return true;  
   }  
   
   public static str description()  
   {  
     return "Customers and sales orders selection";  
   }  
   
   public static void main(Args args)  
   {  
     LILTestWizardClassForm wizard = new LILTestWizardClassForm();  
   
     if (wizard.prompt())  
     {  
       wizard.run();  
     }  
   }  
   
   public void finish()  
   {  
     selectionHelperCustTable  = MultiSelectionHelper::createFromCaller(this.formRun());  
     selectionHelperSalesTable  = MultiSelectionHelper::createFromCaller(this.formRun());  
   
     CustTableDS       = this.formRun().dataSource(tableStr(CustTable));  
     SalesTableDS      = this.formRun().dataSource(tableStr(SalesTable));  
   
     selectionHelperCustTable.parmDatasource(CustTableDS);  
     selectionHelperSalesTable.parmDatasource(SalesTableDS);  
   
     custTable  = selectionHelperCustTable.getFirst();  
     salesTable = selectionHelperSalesTable.getFirst();  
   
     while(custTable)  
     {  
       info(custTable.AccountNum);  
   
       custTable = selectionHelperCustTable.getNext();  
     }  
   
     while(salesTable)  
     {  
       info(salesTable.SalesId);  
   
       salesTable = selectionHelperSalesTable.getNext();  
     }  
   
     super();  
   }  
   
 }  
A questo punto dobbiamo creare un menù item di tipo action che punta a LILTestWizardClassForm e metterlo a menù.

Ecco il risultato:


martedì 2 agosto 2022

D365FO - Process an event based KanBan

 According to the rules defined in the kanban rule form for the item and "event" replenishment strategy, the system will generate for each rule a new kanban.


So in relation to the case shown above we will have 2 kanbans generated.

The first kanban is generated automatically at the sales order line generation for the specific item (as defined in the parameters), the minimum quantity for generating it is 16 pcs, to a maximum of 48 pcs (as defined in the parameters).


The second kanban is generated automatically in relation to the first one, as reported below.


Basically the rules are related to a production flow expressed below in the following diagram.


Each operation is even related to a workcell using the production flow.

So once a sales order line is created for the specified item we get the following kanbans generated in the system.


Before processing the kanban we have to schedule it using the form KanBan schedule board.


In order to advance a kanban of type "process" into the system we have to access the form Kanban board for process job.


In order to complete this kanban we have to start and then complete it using the buttons underlined above. 

In order to use the next kanban related to the one already completed we need to schedule it (on the correct workcell) using the function shown below.


Then we access the function Kanban board for process job.

In order to advance the KanBan we need to start and complete it. Once completed the entire flow is finished and we can ship the items to the final customer.